Thursday 30 April 2015

Shower to Shower week 5

Well everyone I have been on the Dreamweaver Design Team for one year (it doesn't seem 2 minutes since I got the e-mail saying I had been accepted) but I must say it has been one of the most enjoyable experiences and I have enjoyed every moment of it.  Unfortunately I have decided that I am coming off the Dream Team. for numerous reasons, but I will still be showing the products on the Woodware blog and I'm really excited to be doing something similar but different in a challenging way. 

I hope that you will agree with me that over the last 12 months the Dream Team has brought you many lovely cards and inspiration.  I can say I have felt privileged to have been contributing to the Team and I will continue to watch, admire and be inspired by the creations to follow.

Anyway here is my creation for Week 5 - Shower to Shower

 
This is what I used:-
A4 White card
 Dreamweaver Stencil LJ924 Bride
Dreamweaver Alphabet Dies
A5 white card
12 x 12 patterned paper
Light and Darker green card (I used co-ordinations)
Piece of patterned paper
Colorbox ink pad - Gypsy
Olive green polka dot organza ribbon
Big shot 
Dreamweaver embossing rubber mat
White liquid pearls

and this is how i completed the project:-

1 Take the A4 piece of white card and fold in half, take one of the edges and fold back on itself

2 Cut a piece of subtle patterned paper and line the inside of the card, when cutting this, cut the piece so that it is about 1/4 inch smaller around the edges, this will leave a border around your card.  Cut a second piece to cover the front panel of the card again leaving the 1/4 inch border around the front panel.

3 Take the Big Shot machine and the Dreamweaver Alphabet Dies and cut the letters SHOWER in a slightly darker shade of green.

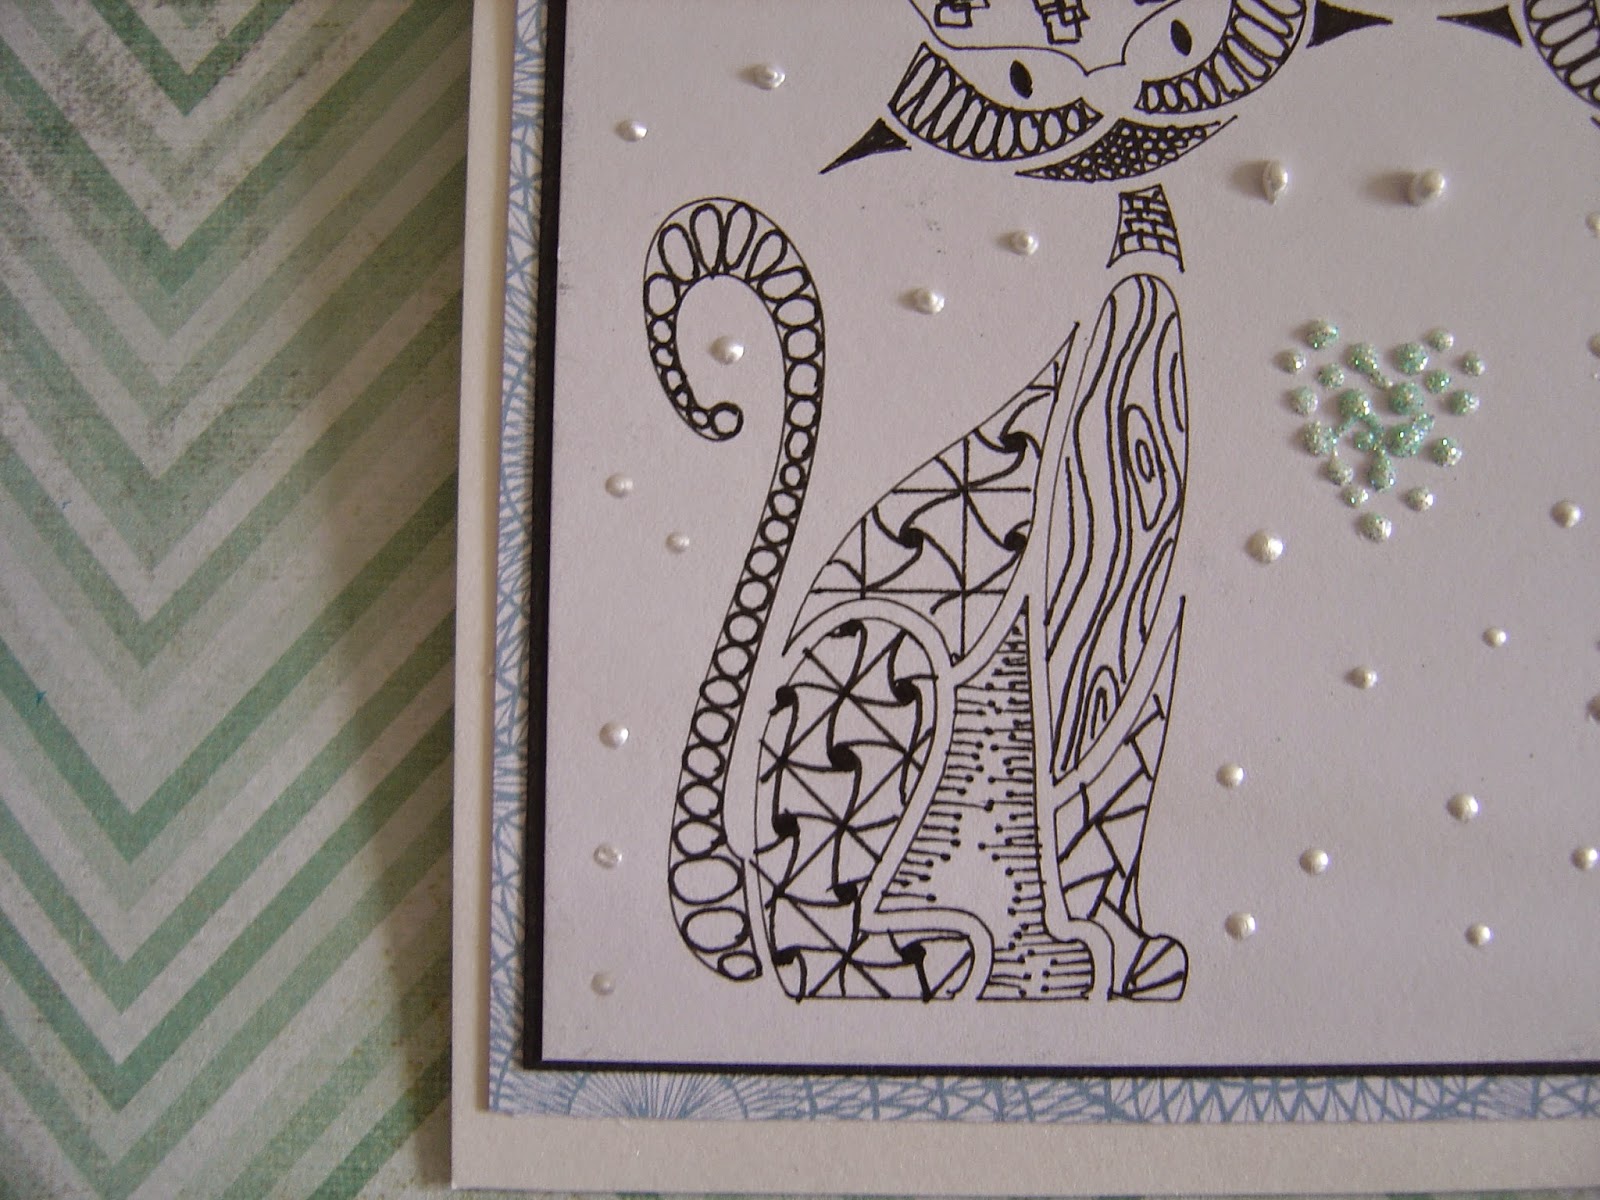
4 Next take the piece of white card and  Bride Stencil and with the embossing matt run through the Big Shot machine.  Remember when embossing make sure that the stencil number and Lynells name are away from the card you are embossing otherwise you will have this  embossing on to your card..  I used the de-bossed side of the embossed white card, and using the rouging technique I lightly coloured the whole of the design with the green ink from the Gypsy ink pad.


5 When this has been done trim down the Bride panel and matt and layer on to the lighter green card and the stronger coloured patternd paper..  Attach this panel to the front panel of the card. Once in place use white liquid pearls and decorate the bodice and neck of the dress and bride and the centre of the flowers in the bouquet.  Place the card to one side and let the liquid pearls dry.

6 Take the SHOWER letters you have cut and place them vertically done the front edge of the card.


7 Final step tie a bow of ribbon and attach to the top left hand corner of the bride panel.

Here is what the Dream team have done this week to inspire you.


If you are in the UK or Europe and would like to purchase any of the products for the above projects they are all available from The Stampman or your local Woodware Stockist.

Thanks for stopping by

Gill

Thursday 23 April 2015

Shower to Shower week 4

Ever use the expression, "When it rains, it pours"? This does not have to be a bad thing, does it? For the month of April, the Dream Team are featuring "Showers of Showers" as our theme. As usual, we'd love for you to play along. Just link your creation on the Dream It Up! blog for a chance to win the stencil of your choice...bonus chances for incorporating Dreamweaver and/or Stampendous in your design. Here's what I'm showering you with this week...
.  
Wedding showers its always good to have one before the wedding but not on the day.  A special card or invite to the wedding shower is always a special moment.

So here is my card for the wedding shower.


This is what I used:

Dreamweaver Stencil LS9 Small swan.
White card
Black card
Champagne mirri board
Colouring medium of your choice I used Chameleon - Cool Grey) 
Koi colouring Brush Pens
Gelly Roll Clear Sparkle pen
Quickie Glue pen
Stampendous Ultra fine crystal glitter
Spellbinder die for the word panel
Printed soft grey patterned paper
Adhesives
Pigma Micron Pen 0.05 in black
3D foam
6 x 6 scalloped edge card

and this is how I put the card together:-

1 Take the stencil and attach to the piece of white card, draw around the swan design with the Pigma pen remove the tape and flip the stencil over and repeat the drawing of the design.

2 Take an orange colour and colour above the beak on both Swans and with a black pen colour in the beaks.

3 The swan was coloured in with the cool grey Chameleon pen in a very gentle shade of the grey.


4 Take the Quickie glue pen and draw lines where you want your Swans to sparkle.  I tried to do this to give the impression of feathers.  The last part of the colouring was to take the Gelly Roll clear sparkle pen and shadow the ripple lines of the water.  The image is now complete.

5 Cut the background matt and stick this to the centre of the card blank., the black and champagne matts were then cut and all these were layers together. To give some depth and dimension to the card I used 3D foam squares between the black and champagne layers.

6 The word element was done using the Big Shot and the Spellbinders die and was cut from the champagne mirri board.  I cut a piece of white card small enough to fit in the panel  and wrote the word SHOWER in dotty capital letters. 
The white card was edged with a grey pen.  When I attached the banner I gently curled the piece so that when it was attached it had some dimension.

Thats your shower invite done and it didn't take long to do.

Here is what the rest of the 'B' team have been doing this week:-


If you are in the UK or Europe and would like to purchase any of the products for the above projects they are all available from The Stampman or your local Woodware Stockist.


Thanks for stopping by.

Gill


Monday 20 April 2015

Tone on Tone

Tone on tone something I don't always think about when I am crafting, but after have the theme for this week I really started to think about the pottery designs from Holland..........Delft pottery, this is all done with the colour of blue in different shades, tints and tones.  In my card today i haven't used the correct colour of blue but a similar idea.

So this is my Tone on Tone card


The requirementsare:-
 
6'' x 12'' piece of card for the base.
6'' x 12'' Patterned coordinating patterned paper
6'' x6'' white card
Tuxedo Black Momento ink pad
Alcohol colouring pens
Stampendous Ultra Fine Crystal Glitter
White pearl adhesive stones in 2 sizes
Magenta Stamp 26.054R
Quickie Glue pen


This is what I did:-
1 Take the 6'' x 12'' backing card and score at 3'' and 9''.  Fold the sides in to make a gatefold card

2 Take the 6'' x 12'' patterned paper and cut 3 panels one measuring 53/4'' x 53/4'' and two pieces 23/4 x 53/4''

3 These pieces are adhered to the backing card, the large piece goes on the inside of the card and the other 2 pieces are placed on the outside of the 2 front panels.  There is no border of the backing card showing  on the inner edges as the paper goes right up to the edge.

4 Take the piece of white card and stamp the image I used the Momento Black ink pad but you could stamp with watermark ink pad and the put embossing powder over and heat with a heat gun.  Once the image has been stamped and is dry the design can be coloured, this is where the different shades of the one pen can be achieved.  However any medium can be used for colouring in the design.

5 In the centre of the flowers and the small groups of 2 and 3 small circles I coloured them in with the Quickie Glue pen and once the glue had gone clear I scattered the Ultra fine Crystal glitter over and removed the excess .........don't waste the glitter put the unused back into the pot.

6 When all the previous steps have been taken use a sharp craft knife and cut around all the frame lines and outside edge, you will have one central panel and 2 frames.


7 To put the card together start with the large outer frame and stick the left side, I used double sided adhesive tape and only put the tape were it need to be not all the way round the frame.

8 Repeat step 7 with the middle panel but this time stick the frame to the right side of the gatefold and only put tape where it needs to be.

9 The centre square is the attached to the left side and only has tape put where it needs to be stuck.


10 I then took the 2 sizes of  white adhesive pearls and coloured them with the same alcohol pens, positioning the larger ones on the larger circles in the design and the smaller ones on the medium circles.

11 The final step was to place some of the small sized adhesive pearls on to the 4 outer corners of the card.  5 of the  pearls were used in each corner.

Thats it card complete another option that could be used is to put a plain white matt on the inside of the card so that sentiments and messages can be incorporated into the design.

Hope you like my card and will have a go.

If you are in the UK or Europe and would like to purchase any of the products for the above projects they are all available from The Stampman or your local Woodware Stockist.  

Thanks for stopping by

Gill


Tuesday 14 April 2015

The Mirror Cracked .....Masterboard


Woodware are sponsoring The Mirror Crack'd this month so pop over to there blog for some inspiration and the join in on the Mirror Crack'd blog.


Masterboard........ I wondered what it was,  never having really attempted to use the Creative Palette. I was advised to look on the internet as there were lots of samples etc. there for you to look at.  I realised on looking the it was similar to mixed media / altered art. 

So here is my first attempt at Masterboard and the card I made with it.


This is what I used:-

8'' x 8'' white card blank
1 sheet of Craftwork cards Velvet Plum patterned paper
Dark blue card
Patterned lilac card
Blue card
White card
Colorbox Crafters refill ink- Lemon, Aruba, Jungle
Sentiment stamps
Craft knife
0.05 Black Pigma micron pen
Momento Tuxedo Black ink pad
Creative palette
Hand sanitiser
Texture items for creating pattern on Creative palette
Woodware clear magic Stamps JGCL572 Daisy layers
Koi Colouring Brush Pen Set
White Liquid pearls
Brayer 
Kitchen Paper
Woodware wet wipes


and this is what I did :-

 1 Starting point is the centre panel.  Take the Creative Palette and put a small amount of Sanitiser on to it and then using the Brayer spread this out evenly.  Then take the Crafters ink and put a few drops of each colour over the palette  and again spread evenly with the brayer.  Take care and gently spread the colours......... it doesn't matter how much they combine its all part of the design  (and no 2 will be the same)

2 Take any items you have with texture and press into the inked surface of the creative palette the texture will be lifted so you can used stamps, bottle tops,forks embossing tools any thing with texture.  Once you are happy with your design then place a piece of white card over the palette and press down all over the surface the result will come away cleanly and be unique.  Place this panel to the side to dry.  Once dry take some kitchen paper and buff the surface to remove any excess of the sanitiser and ink. Trim this piece to the size you need for your design.


3 Additional design and texture can be added at this stage.  I stamped flowers and leaves randomly over the piece.  The leaves I stamped with 1st and 2nd generation stamping to give different shades to the background.

4 Then the flowers were coloured with the Koi Colouring brush pens  I used #29 Green and #43 Prussian blue for the centres of the flowers.  Once coloured place this piece to the side. Cut the Blue matt and the lilac patterned card matt to the required size.


5 Take the Craftwork cards patterned  paper and trim to the size you want and then with a crafts knife cut around the leaves so that the Masterboard panel will fit in.  Cut the final matt of the dark blue and adhere all the layers together.

6 For additional decoration I did the following extras. Around the edge of the patterned lilac card I drew 2 lines random and interlinked with the 0.05 Pigma pen then to give this layer a 'frame', and then stamped the odd leaf around the edge again using 1st and 2nd generation stamping using the Momento ink pad.


I added small dots of the liquid pearls in the centres of the patterned paper flower design and at the tops of the petals this was to add interest .  I also did a few of the small dots on the stamped flower petals.

7 The sentiment  was stamped on to a white piece of card and this was then matted on to the blue and lilac patterned card and the lines were drawn once again around this edge.


8  The final pieces to be done were the flower and 2 leaves which were stamped on the spare Masterboard, they were cut out and once the sentiment was attached to the card using 3D foam the flower and leaves were attached.

Theres your card it could be used for all sorts of occasions and done in totally different colours


If you are in the UK or Europe and would like to purchase any of the products for the above projects they are all available from The Stampman or your local Woodware Stockist.


I hope you like the card, thanks for stopping by.

Gill

Thursday 9 April 2015

Shower to shower week 2


Ever use the expression, "When it rains, it pours"? This does not have to be a bad thing, does it? For the month of April, the Dream Team are featuring "Showers of Showers" as our theme. As usual, we'd love for you to play along. Just link your creation on the Dream It Up! blog for a chance to win the stencil of your choice...bonus chances for incorporating Dreamweaver and/or Stampendous in your design. Here's what I'm showering you with this week...

The theme Showers to shower brings up lots of ideas............rain showers...........wedding showers........baby showers.

All the above have special memories for everyone and I think its really good if the stationary for these events are memorable.  So this week I have decided to go for the wedding theme. As spring arrives and summer is on its way the Wedding season kicks off.  I also thought that the 'shower' card could also be continued through the rest of the wedding stationary.

So here is my idea for this week


The things I used were as follows:-

Dreamweaver Stencil LL3020
Black Pigma Micron pens 0.3 and 0.05
White liquid pearls
Stampendous ultra fine glitter in a colour of you choice ( I used mint )
White card
Black card Blue patterned paper or card
Low tack tape
Adhesives


and this is how I put the card together:-

1 Take the stencil and attach to a piece of white card using low tack tape and using the Black Pigma Micron 0.05 pen draw the stencil design, once this is done done flip the stencil over and repeat the drawing stage.


2 Remove the stencil and start to doodle / stentangle all the areas of the design.

3 Cut all the matts and layers for your Shower card, and then layer these on to the base card.


4 To finish the card off I used the White Liquid Pearls and randomly put dots all over the card, in the centre of the design I put a heart shape using the dots of liquid pearl and over this I scattered the ultra fine glitter


For a shower of inspiration, please visit the blogs of the "B" team:
If you are in the UK or Europe and would like to purchase any of the products for the above projects they are all available from The Stampman or your local Woodware Stockist.

Thanks for stopping by and hope you enjoyed the card.

Gill


Monday 6 April 2015

Bookmarks

I am so lucky to have spent the last year on the Dreamweaver Dream Team and to now be on the Woodware Design Team.  I love all the Woodware products and can safely say I have been using them for the last 11 or 12 years.

When I got the list of titles for the next few months I was really inspired. The theme of bookmarks seemed to be a great idea........... even though many people are now using technology for their reading a book mark still is handy for those books that we all have.


The list of things I used is below:-
A4 White card
A5 white card
A4 black card
Black Momento ink pad
Clear Magic Decorative Dove JGS384 
Clear Magic Owl stamp set
Colouring medium of your choice
Black Micron Pigma Pen 0.3
Dutch Doodledoo Butterflies
Liquid pearls - white
Watermark Ink pad
Dreamweaver Metallic FX - Gold Dust
Olive green organza ribbon with dots

TOOLS
Paper Trimmer -Straight Blade and Perforating Blades
Stencil Brush
Cut and Dry Foam


The first step was cutting the white card to the depth I wanted my bookmark to be, this piece was the score into 4 equal panels and the angled tops of the bookmarks were then cut (I marked my card at 1'' and this gave me the top I wanted).  Once this was done I then re-scored the lines with the perforating blade, the bookmarks could then be detached.


The black panels were the next to be cut and applied to the card.  The Owl panels were stamped  and coloured.,the green background was achieved by using Cut and Dry foam and a green ink pad.  For the middle panel the strings holding the bird houses was done using the Dangles technique and the micron pen.  This was also used for the Faux stitching around the white panels.


The front panel was the last panel to be done and  for this I stamped the sentiment from the Decorative Dove Stamp set.  I used the watermark ink pad and then covered this with the Dreamweaver Metallic FX Gold Dust powder.  The butterflies were then applied and the liquid pearls provided my butterfly trails.


The front panel, the butterflies were only glued down the bodies so that the wings could be lifted.  The final thing i did was to attach the ribbon bows at the top of the bookmarks.

Hope you like my 3 Bookmark Gift card

Thanks for stopping by


Regards 

Gill