There are lots of birthdays over the Summer months. I know that I've got quite a number between June and August.
This is my Summer birthday card

This is what I used
Clear Magic Deco Rose stamp
White base card
Colouring medium of your choice
Piece of white card
2 pieces of patterned paper
Versamark ink pad
Magenta Frame
Stampendous Aged Silver Frantage
Versafine black ink pad
This is how I made the card
1 Take a piece of white card and stamp the rose bowl using a dye based black Versafine ink pad.
2 Using the colouring medium of your choice colour the rose bowl in. I didn't colour all of bowl only the patterned part of the design.
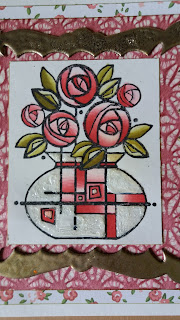
3 Once the design is coloured in, cover the uncoloured sections of the bowl with glossy accents. I left mine about 1/2 hour and decided I wanted to get on with my card, so I got my heat gun out and started by heating from underneath and again getting impatient I started to heat from the top, I found that the Glossy accents blistered and when the heat gun was removed and the substance had cooled slightly if it was pressed down (carefully) it gave the impression of crackled surface.

4 The next step is the Magenta frame. Take the versamark ink pad and cover the whole of one side of the frame with the glue. Move the frame on to a spare piece of paper and scatter the Aged Silver Embossing powder over the frame lift the frame from the paper and place on a flat surface. When using the heat gun to melt the Aged Silver powder start with the heat gun a fair distance from the frame and as it starts to metal lower the heat gun down to complete the embossing process.. I put 2 layers of embossing powder on to the frame. For the 2nd layer I repeated the same process as for the 1st layer

5 With the completely dry stamped panel trim the piece down so that it fits behind the frame.

6 Almost finished next take one of the patterned papers and cut a 6'' x 6'' piece and then with the second patterned paper cut a piece 6.5'' x 6.5''
7 Matt and layer all the pieces together. To attach the centre panel and the frame use a strong wet glue to ensure the pieces hold.
8 Finally place small adhesive gems on the dots in the stamped image.
So there is your Summer Birthday card, hope you like it. Thanks for stopping by and for more ideas and inspiration have a look at the Woodware blog.
Thanks
Gill


